%201.svg)


UV Light Installation: Where to Put It and Why It Matters
October 1, 2025
What is an HVAC UV Light and Why Do You Need One?
UV light installation involves placing germicidal lamps inside your HVAC system to kill mold, bacteria, and other harmful microorganisms as air circulates through your home. Here's what you need to know:
Key Installation Locations:
- Coil sterilization: Near the evaporator coil to prevent mold growth
- Air sterilization: In the return air duct for whole-house air purification
Essential Safety Steps:
- Turn off power at the circuit breaker
- Wear UV-protective eyewear and gloves
- Protect non-UV-resistant materials with aluminum tape
Installation Process:
- Choose optimal placement based on your coil type (A-shaped or N-shaped)
- Use a hole saw to cut into ductwork
- Mount the UV light securely
- Connect to power source (plug-in or hardwired)
If you've noticed musty odors or family members experiencing more allergies lately, your HVAC system might be harboring unwanted guests. UV lights work by emitting ultraviolet radiation that damages the DNA of microorganisms, preventing them from reproducing and causing health issues.
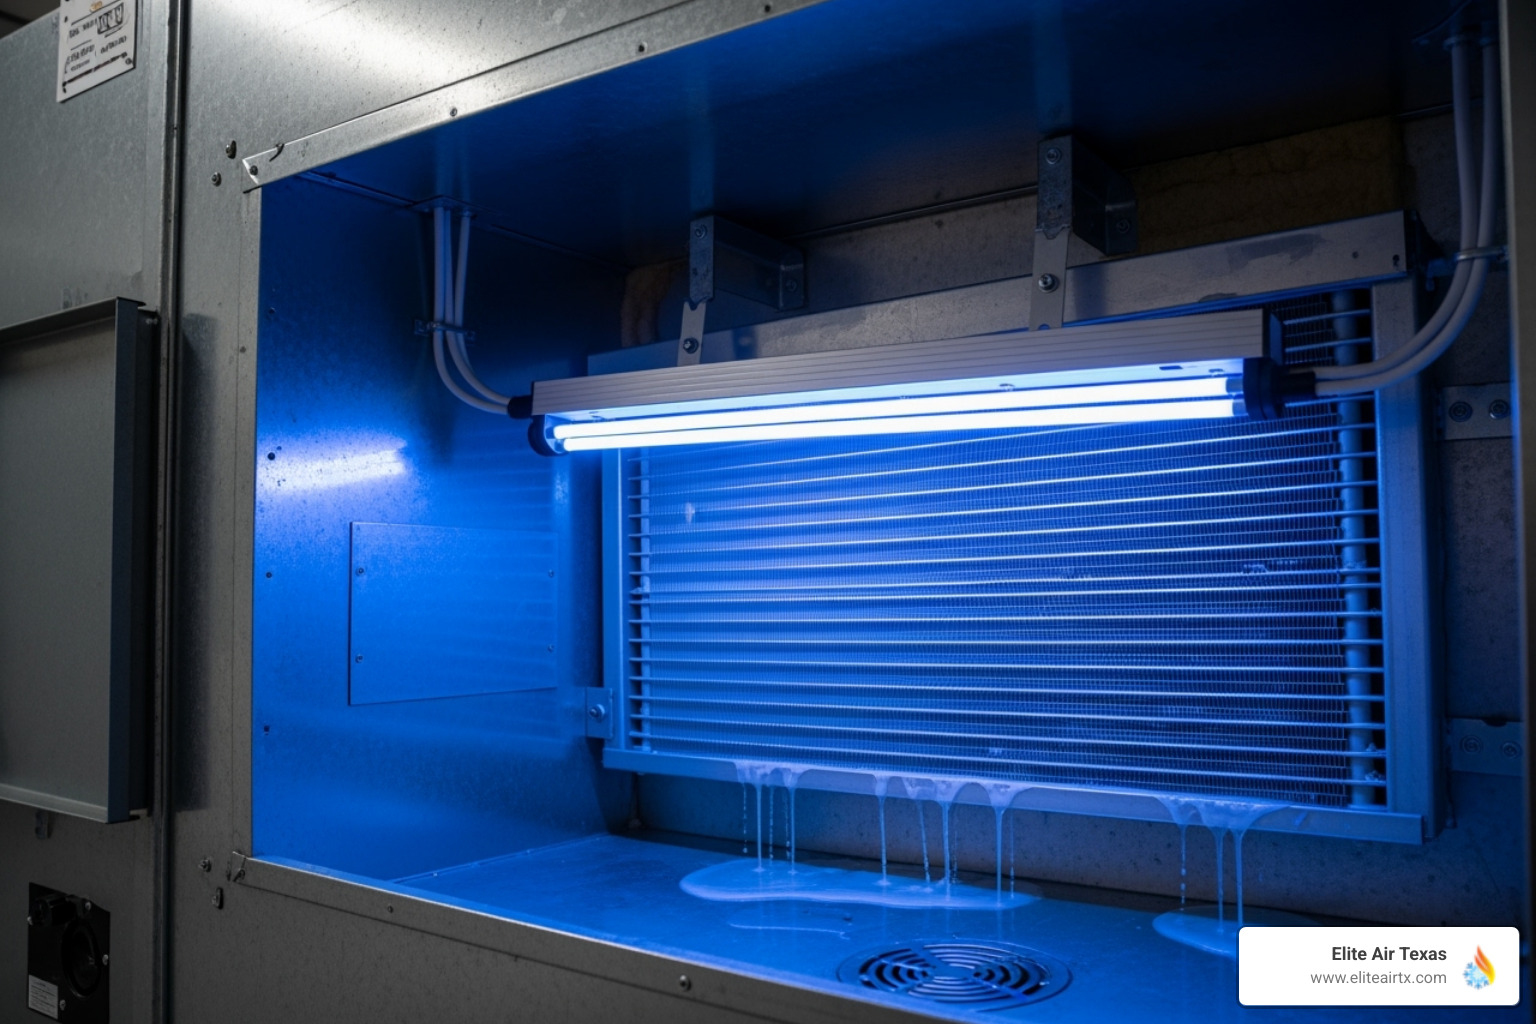
The most common installation spots are near your evaporator coil - where moisture creates the perfect breeding ground for mold and bacteria. For A-shaped coils, the best placement is above and downstream of the coil. For N-shaped coils, install above or below, closer to the drip pan.
Professional installers report that UV lights can eliminate up to 99% of germs and allergens while also keeping your HVAC system cleaner and more efficient. This means fewer maintenance calls and better indoor air quality for your family.

Before You Begin: Safety, Tools, and Planning Your Installation
Installing a UV light installation in your HVAC system might seem straightforward, but there's more to it than just drilling a hole and plugging in a lamp. Think of it like performing surgery on your home's breathing system – you want everything sterile, precise, and safe.
The good news? With proper preparation and the right approach, this is absolutely a project you can tackle yourself. We've guided countless homeowners through this process, and the key is always the same: respect the power of both electricity and UV radiation, plan your work carefully, and choose the right equipment for your specific system.

Crucial Safety Precautions for UV Light Installation
Here's the truth about UV lights: they're powerful enough to destroy microscopic organisms, which means they're powerful enough to hurt you if you're not careful. But don't let that scare you off – just treat them with the respect they deserve.
Power down completely before you start. Head to your circuit breaker and flip the switch for your HVAC system. This isn't a "maybe" step – it's absolutely essential. If you have a lockout/tagout procedure available, use it. You don't want anyone accidentally restoring power while your hands are inside the system.
The UV radiation itself poses real risks to your eyes and skin. We're talking about the same type of radiation that causes sunburns and eye damage, but concentrated. Always wear UV-protective eyewear and gloves during installation and any future maintenance. The dangers of ultraviolet (UV) radiation include serious eye conditions and skin damage – protection isn't optional.
Your HVAC system has some components that don't play well with UV light either. Plastic components, certain wiring insulation, and flexible ductwork can degrade over time when exposed to UV radiation. The solution is simple: use aluminum foil tape to shield any sensitive materials that might be in the direct path of the UV light.
If any part of this process feels overwhelming or unsafe, our team at Elite Air Texas offers Indoor Air Quality Services and can handle your UV light installation with the expertise and safety protocols you deserve.
Tools and Materials You'll Need
Getting organized before you start saves time and frustration later. Most UV light kits come with the basics, but you'll need some additional tools to complete the installation properly.
Your UV light kit should include the lamp itself, a power supply (called a ballast), mounting brackets, and usually some warning labels and a safety sight glass. Beyond that, you'll need a power drill for pilot holes and securing screws, plus a hole saw kit for cutting clean circles in metal ductwork. We've had great success with the Milwaukee hole saw kit – it includes multiple sizes and cuts through ductwork like butter.
Don't forget the smaller essentials: a screwdriver set for various fasteners, wire strippers if you're hardwiring the unit, and extra self-tapping screws (trust us, you'll want backups). Your measuring tape and marker ensure accurate placement, while safety glasses and gloves keep you protected throughout the process.
Keep some aluminum foil tape handy for protecting sensitive components from UV exposure. This reflective tape is your best friend for preventing material degradation down the road.
Choosing the Right UV Light for Your System
Here's where many people get confused: not all UV lights do the same job. The two main types serve different purposes, and choosing the wrong one is like bringing a screwdriver to a hammer job.
Coil sterilization UV lights focus on surface disinfection. They're mounted to shine directly on your evaporator coil and drain pan, preventing mold and bacterial growth where moisture creates perfect breeding conditions. These lights excel at eliminating that musty "gym sock" smell that comes from biofilm buildup on coils.
Air sterilization UV lights take a different approach – they're installed in the ductwork to kill airborne microorganisms as air flows past. Think of them as a checkpoint that neutralizes viruses, bacteria, and allergens before they circulate through your home.
| Feature | Coil Sterilization UV Lights | Air Sterilization UV Lights |
|---|---|---|
| Primary Goal | Prevent mold and bacterial growth on evaporator coil | Kill airborne microorganisms in the air stream |
| Placement | Mounted directly to shine on the evaporator coil | Mounted in the return air duct or supply plenum |
| Target | Surface disinfection (coils, drain pan) | Airborne disinfection (viruses, bacteria, allergens) |
| Effectiveness | Highly effective at preventing biofilm buildup | Effective at reducing circulating pathogens |
| Continuous Use | Often designed for continuous operation when HVAC is on | Can be wired to run continuously or with blower operation |
The choice depends on your main concern. If you're battling persistent mold on your coils or dealing with musty odors, coil sterilization is your answer. If you want broader air purification to reduce allergens and airborne pathogens throughout your home, air sterilization makes more sense. Some homeowners install both for comprehensive protection.
The Ultimate Guide to HVAC UV Light Installation
Ready to transform your home's air quality? Let's walk through the UV light installation process step by step. Don't worry – we'll take this nice and slow, making sure you understand each phase before moving on. If anything feels beyond your comfort level, there's no shame in calling the professionals. Your safety is always more important than saving a few bucks.

Step 1: Determine the Optimal Location
Location, location, location – it matters just as much for UV light installation as it does in real estate. Get this right, and your UV light will work like a champion. Get it wrong, and you'll be scratching your head wondering why it's not making a difference.
The evaporator coil is your main target. Think of it as the villain's hideout – it's dark, damp, and the perfect breeding ground for mold and bacteria. Your UV light needs a clear shot at this troublemaker.
For A-shaped coils (they look exactly like you'd expect), your sweet spot is above the coil, right in the center, on the downstream side. This gives you maximum coverage where the air flows out. If space is tight up there, don't panic – placing it below near the drip pan works too. The key is getting that UV light to shine directly on as much coil surface as possible.
N-shaped coils are a bit trickier since they zigzag like the letter N. Here, you want to position your light either above or below the coil, but definitely closer to that drip pan where moisture loves to hang out. This placement ensures you're hitting the wettest areas where microorganisms throw their parties.
If you're going for air sterilization instead, the supply plenum or return air duct becomes your playground. The goal is simple: give that UV light enough time to zap the bad stuff as air moves through your system. Think of it like a security checkpoint – the longer the exposure time, the more thorough the screening.
Living in humid areas like Fort Worth means coil contamination is practically inevitable. That's why combining regular AC Coil Cleaning Services in Fort Worth, TX with UV light creates an unbeatable defense system.
Step 2: Prepare and Mount the Unit
Time to get your hands dirty! This is where careful measuring meets power tools, so let's make sure we do this right the first time.
Start by taking precise measurements using the template that came with your kit. If there's no template, measure twice and mark your spot clearly. Trust us – there's nothing worse than drilling a hole in the wrong place and having to explain that to your spouse.
When you're ready to drill the hole, metal ductwork requires a proper hole saw. Take your time here – rushing leads to jagged cuts and frustration. The hole needs to be just the right size for your UV lamp or mounting base. If you're working with duct board instead of metal, you might need to cut a rectangular opening.
Mounting the bracket comes next, and this is where those self-tapping screws earn their keep. Make sure everything is secure and level – a wobbly UV light isn't doing anyone any favors. When you insert the UV lamp, wear those gloves we talked about earlier. The oils from your skin can actually reduce the bulb's effectiveness and shorten its lifespan.
Don't forget to seal everything up with aluminum foil tape or appropriate sealant. This prevents air leaks and keeps that powerful UV light safely contained within your system. Nobody wants accidental UV exposure in their living room!
Step 3: Powering and Testing Your UV Light Installation
We're in the home stretch now! Getting the power connection right is crucial – this is what separates a successful installation from a expensive paperweight.
Most residential kits come with a plug-in transformer, which is usually your simplest option. Just make sure you have a nearby outlet that can provide continuous power. Some folks prefer the cleaner look of hardwiring directly into the HVAC system, but here's where we strongly recommend bringing in a licensed electrician or HVAC professional.
Here's why hardwiring gets tricky: you need to wire to a constant power source, not the blower relay. Coil sterilization lights need to run even when your fan isn't, while air sterilization units might run continuously or with blower operation. Wire it wrong, and you could damage your system or create a fire hazard. Our HVAC Services in Fort Worth, TX team handles these electrical connections safely every day.
Testing time is the moment of truth! Restore power at your circuit breaker and look for that telltale blue glow through the safety sight glass. Some units have LED indicators – blue means you're golden, red means there's a problem. If your system has an interlock switch, test it by opening the access panel. The light should cut off immediately, protecting you from UV exposure.
When that blue glow appears and everything checks out, take a moment to feel proud. You've just installed a powerful ally in the fight for cleaner, healthier indoor air!
Maintaining Your HVAC UV Light for Peak Performance
Just like any other component of your HVAC system, your UV light requires a little TLC to remain effective. Regular maintenance ensures it continues to purify your air and protect your coils.
Routine Cleaning and Bulb Replacement
UV lamps are not "install and forget" devices. Their germicidal effectiveness diminishes over time, even if they still appear to be glowing.
- Bulb Lifespan: Most UV light bulbs need to be replaced every 12 to 24 months. Even if the bulb still emits visible light, its ability to produce germicidal Ultraviolet light (UV-C) at the effective wavelength (around 254 nm) significantly decreases after this period. Think of it like a flashlight whose batteries are dying – it still makes light, but it's not as bright or effective.
- Cleaning the Bulb: Every 3 to 6 months, we recommend carefully cleaning the UV bulb. Turn off the power, remove the bulb (wearing gloves!), and gently wipe it down with an isopropyl alcohol wipe and a lint-free cloth. Dust and grime can accumulate on the bulb, blocking the UV light and reducing its effectiveness.
- Checking Ballast and Wiring: Annually, inspect the ballast (the power supply) and all wiring for any signs of wear, corrosion, or damage. Ensure all connections are secure. If you notice any issues, it's best to contact a professional for HVAC Maintenance in Arlington, TX or your local Elite Air Texas service area.
Understanding UVGI vs. PCO Technology
When exploring UV lights for HVAC, you might encounter two main technologies: Ultraviolet Germicidal Irradiation (UVGI) and Photocatalytic Oxidation (PCO). While both use UV light, they achieve air purification in different ways.
- Ultraviolet germicidal irradiation (UVGI) system: This is the more traditional form of UV air purification. UVGI systems use short-wave ultraviolet C (UV-C) light to destroy the DNA or RNA of microorganisms like bacteria, viruses, and mold spores. They essentially sterilize or inactivate these pathogens, preventing them from reproducing and spreading. UVGI is highly effective against biological contaminants.
- Photocatalytic oxidation (PCO) system: PCO systems also use UV light, but they pair it with a titanium dioxide-coated filter or catalyst. When the UV light strikes the catalyst, it creates a reaction that produces highly reactive oxidizing agents (like hydroxyl radicals). These agents then break down volatile organic compounds (VOCs), odors, and even some microorganisms into harmless byproducts like water vapor and carbon dioxide. PCO systems are excellent for addressing odors and chemical pollutants in addition to biological ones.
Choosing between UVGI and PCO depends on your specific indoor air quality concerns. If your primary goal is to kill biological pathogens and prevent mold, UVGI is a direct and effective solution. If you're also struggling with odors, chemical fumes, or VOCs, a PCO system might offer more comprehensive purification.
Frequently Asked Questions about HVAC UV Lights
We've been helping Texas homeowners with UV light installation for years, and these are the questions that come up most often. Let's clear up some common concerns and misconceptions.
Can UV light effectively kill mold in an HVAC system?
Absolutely! This is one of the most rewarding aspects of UV light installation - watching families finally get relief from persistent mold issues. UV-C light is incredibly effective at destroying mold because it attacks the problem at its source.
Here's how it works: mold spores need their DNA intact to reproduce and spread throughout your home. When UV-C light hits these spores, it literally destroys their genetic material, making it impossible for them to multiply. Think of it like scrambling the mold's instruction manual - without those instructions, it simply can't survive.
The key is direct line-of-sight exposure. That's why we always emphasize proper placement during installation. The UV light needs to shine directly on the areas where mold loves to grow - especially around your evaporator coil where moisture creates the perfect breeding ground.
For maximum effectiveness, your UV light should run continuously. This ensures that any new spores that try to settle get zapped immediately, preventing regrowth on coils and keeping your system clean and healthy.
Do HVAC UV lights produce harmful ozone?
This is such an important safety question, and I'm happy to say that modern HVAC UV lights are designed to be ozone-free. You shouldn't have to worry about this with quality equipment.
The confusion comes from the fact that certain UV wavelengths can create ozone - specifically those below 200 nanometers. These shorter wavelengths can split oxygen molecules, which then recombine to form ozone, a potentially harmful gas.
However, quality HVAC UV lights emit light at around 254 nanometers - the perfect germicidal wavelength that kills microorganisms without producing ozone. When shopping for your UV light system, always check the manufacturer specifications to confirm you're getting an ozone-free model.
This is another reason why choosing reputable products matters. Cheap, poorly designed UV lights might not have the proper wavelength control, potentially creating safety issues in your home.
Can UV light damage my HVAC system?
This is a legitimate concern, and the honest answer is yes, UV light can damage certain materials - but only if you don't take proper precautions during installation. That's why the preparation steps we covered earlier are so crucial.
Several components in your HVAC system aren't designed to withstand constant UV exposure. Plastic drain pans can become brittle and crack over time. Flexible ductwork materials may weaken and deteriorate. Most concerning, wire insulation can break down, creating potential electrical hazards.
The good news? These problems are completely preventable with proper UV light installation techniques.
UV shields are your first line of defense. Many quality UV light kits include these protective barriers, or you can purchase them separately. They block harmful rays from reaching sensitive components while still allowing the light to do its job on coils and airflow.
For areas that can't be shielded, reflective aluminum foil tape works wonders. We use this to cover wire insulation, flexible duct connections, and other vulnerable materials. It's an inexpensive solution that can save you from costly repairs down the road.
Strategic placement is equally important. When you follow the installation guidelines for your specific coil type, you're naturally directing the UV light where it's needed most while minimizing exposure to sensitive components.
With these simple protective measures, you can enjoy all the air quality benefits of UV purification without compromising your HVAC system's longevity.
Conclusion: Breathe Easier with a Properly Installed UV Light
Congratulations! You've just taken a significant step toward creating a healthier, cleaner home environment. UV light installation isn't just about adding another gadget to your HVAC system—it's about changing the very air your family breathes every day.
Think about it: every time your system cycles on, that UV light is working tirelessly to eliminate harmful microorganisms, reduce allergens, and keep your evaporator coils sparkling clean. No more musty odors greeting you when the AC kicks on. No more wondering if that persistent cough is related to poor indoor air quality. With a properly installed UV light, you're creating a healthier home environment where everyone can breathe easier.
We've covered a lot of ground together—from understanding the crucial safety precautions to selecting the right type of UV light for your specific system. You've learned about optimal placement for both A-shaped and N-shaped coils, proper mounting techniques, and the importance of regular maintenance to keep everything running smoothly.
But here's the thing: while this guide provides you with all the knowledge needed for a successful DIY installation, we completely understand if you'd prefer to leave this job to the professionals. Working with electricity and UV lights requires precision, and there's absolutely no shame in wanting that extra peace of mind that comes with expert installation.
At Elite Air Texas, we've seen how UV lights can transform indoor air quality for families throughout our service area. Whether you're dealing with persistent mold issues, looking to reduce allergens, or simply want to maximize your HVAC system's efficiency, our experienced technicians know exactly how to position and install your UV light for optimal performance.
The beauty of professional installation goes beyond just safety—it's about ensuring maximum effectiveness. Our team understands the nuances of different HVAC configurations and can spot potential issues that might not be obvious to the average homeowner. Plus, with our expertise, you can be confident that your investment will pay dividends for years to come.
Whether you're in Dallas, Fort Worth, Arlington, or any of the surrounding Texas communities we serve, we're here to help you achieve the clean, healthy indoor air your family deserves. Don't let another day go by breathing subpar air. Contact us for professional air conditioning services in Dallas, TX and find why so many homeowners trust Elite Air Texas for their indoor air quality needs.
Your family's health and comfort are worth it—and with a properly installed UV light, you'll wonder why you waited so long to make this important upgrade.

Ready to Enhance Your Comfort?
Contact our experts today to discover tailored HVAC solutions that fit your needs perfectly.

